Make Your Very Own Uterus Challah This Shabbat
Updated for Repro Shabbat 2023/5783. Since we last published this recipe, Roe v. Wade was overturned, followed by wave after wave of punitive state restrictions on bodily autonomy and abortion access. Read the original Uterus Challah recipe here.
The kneading grounds me;
how many mothers
in how many kitchens
over how many generations
were clutched by fear as they
gently
brought strands together into one whole
creating something from nothing.
I wonder
did Shifra and Puah plot their resistance
while they waited for dough to rise?
It has never been just about bread
week after week.
It has been about
nourishing our bodies
choosing for ourselves.
I believe food is nourishment and food is justice. Every Friday night for generations and generations, we’ve stood in kitchens and we’ve kneaded and braided challah into life for Shabbat. We’re going to bring all of those things together today while I teach you how to make a uterus challah for Repro Shabbat 2023/5783 with NCJW and Lilith.
A Uterus Challah
You can start with your favorite challah recipe. Here’s a riff on the one I picked up from Henya, the Chabad rebbetzin who didn’t care that my mom is a lapsed Catholic, or maybe did, but cared in a way that led her to teach me how to make challah and Shabbat dinner fixings on a lot of Thursday evenings in college.
Challah Recipe
| Ingredients: 1 package of active dry yeast 2 tsp sugar or honey ½ cup warm water ⅓ cup sugar 1 cup warm water ⅓ cup oil (a neutral oil like vegetable or canola) 1 egg 2 tsp salt 5 cups flour 1 egg Mix-ins of your choice Toppings of your choice |
Note: This dough is really adaptable – if you like sweeter challah, you can add ⅓ cup of honey with the ⅓ cup sugar, or if you want a savory version, you can add roasted garlic or herbs, sprinkle with sea salt, etc.
Making the Dough:
- Combine the yeast, 2 tsp sugar or honey, and ½ cup warm water in a large glass bowl or the bowl of a stand mixer. Leave them to activate the yeast for 15-20 minutes – it’s ready when you see a foamy bubble on top of the water.
- Mix in the rest of the sugar, warm water, oil, one egg, and salt. Add 2 cups of flour and mix with a mixing spoon or the dough hook on your electric mixer. When the flour is fully incorporated, add 2 more cups of flour. The dough will still be very sticky – that’s ok. If you are kneading by hand, spread half a cup of flour on your clean countertop and knead your dough until it is smooth and still a little sticky, adding the rest of your last cup of flour as needed to get it there. If you are using a mixer, slowly add the last cup until the dough is smooth and only sticks a little to the bowl. Make sure you scrape down the sides and bottom so all the flour is getting incorporated or you will add too much.
- Grease a large bowl with cooking spray or neutral oil. Place your dough inside, flip it over and move it around so it is covered very lightly in the oil, to keep it from drying out. Cover the bowl with plastic wrap and put it in a warm place for a few hours, until it doubles in size.
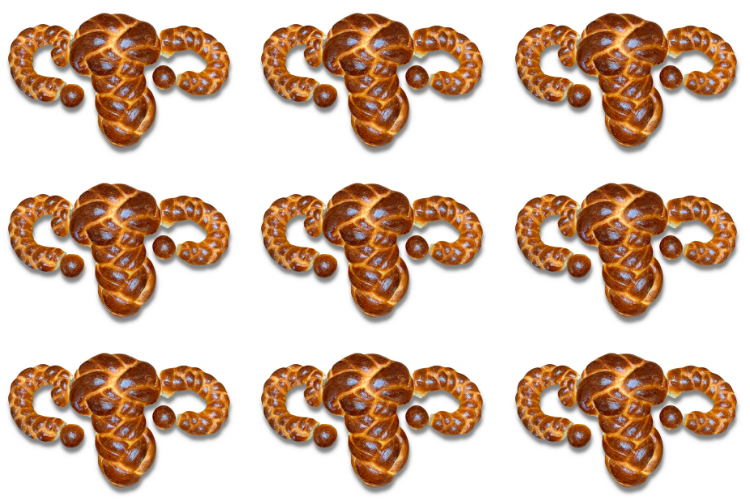
Braiding Your Uterus*:
*Just like your bubbe and your bubbe’s bubbe used to!
Step One: After the challah doubles in size, gently roll it into a ball on your counter and divide it up:
- ⅔ for your uterus/cervix/vagina
- ⅓ for your fallopian tubes and ovaries
This made the best ratio for me, but reproductive systems aren’t cookie-cutter. Add elements that work for you: tie your tubes, drop an ovary, include a second uterus…
Step Two: Let’s start with the uterus. Divide your larger chunk of challah into six pieces, as equal as possible. Roll them into six long, thin dough snakes. Pair them up, and lay them out as shown, in three sections. You’re going to braid them like a summer camp friendship bracelet, but it will look extra fancy and taper into a vagina situation naturally. Take the two strands on the left, place them over the middle strands and set them down in the center. Take the two strands on the right, place them over the new middle strands and set them down in the center. Repeat until you run out of strands. Pinch all the strands together at the top and curl them under the top of the braid. Use a knife to cut the bottom into more of a tapered triangle and pinch the ends together so they don’t split in the oven.
Step Three: Gently pick it up and set it on a baking sheet. I like to line mine with parchment paper because I am too lazy to wash the tray by the time I have eaten half a challah.
You should know that this is the point in my culinary process where my husband wandered into the kitchen, asked me if I was going to put a king cake-baby inside, and noticed that I was listening to “100 Tampons” by Marcia Belsky on repeat.
Step Four: Take two small balls of dough, about the size of quarters, from the remaining ⅓ of the dough. Gently roll them into ovals for your ovaries. Set them on the baking sheet. Divide the remaining dough into six equal(ish) pieces. Just as you did before, roll them into snakes, but this time as thin as you can. Take three and lay them out just as before. You’ll do the same braid, just a single-strand version. Left strand over the middle strand to the center; right strand over the middle strand to the center. Repeat until you run out of dough, and pinch the three strands together at each end. Do the same with your last three strands of dough. Place your two thin single strand fallopian tubes on your baking sheet, gently curling them into C-shapes (one regular, and one facing backward) and giving them a little space from the uterus. Cover loosely with a kitchen towel and let rise in a warmish spot for 30-45 minutes. Preheat your oven to 400F.
Step Five: Crack open your last egg, and put the egg yolk only into a small dish. If you’re not great at separating eggs, don’t worry about it and scramble up the whole thing in the small dish. Gently paint your challah pieces with the egg wash with a food paintbrush if you’re feeling fancy, or just gently with the back of a spoon or your finger if you don’t have one.
Step Six: Bake for 15 minutes in the center of your oven, and then (without opening the oven) turn the temperature down to 325F. Bake for another 15 minutes. When the time is up, your repro challah should be a beautiful, shiny golden brown. If you flip it over (gently, using an oven mitt!) and knock on the bottom, it should sound hollow – that’s how you’ll know when it’s done.
Step Seven: Assemble on a cutting board, snap a photo, share and tag it with #ReproShabbat @ncjw @lilithmagazine so we can reshare your gorgeous creation!